This the multi-page printable view of this section. Click here to print.
Git
- 1: Git pull requst
- 2: Adding a SSH Key for GitHub Repository
- 3: GitHub gh Command Line Interface
- 4: GitHub hid Repository
1 - Git pull requst
It is very easy to help us modifying the Web Site through GitHub pull requests. We demonstrate this via the commandline and via the GitHub GUI.
The commandline can be run form any computer with Linux, Windows, and macOS. ON Windows you need to install gitbash and use that. THis way you have a commandline terminal that just works like on LInux and OSX.
Github Pull Request via the commandline
9:15 min
Github Pull Request via the GitHub GUI
2 - Adding a SSH Key for GitHub Repository
Jacques Fleischer, Gregor von Laszewski
Abstract
We present how to configure an SSH Key on GitHub so that you can clone, commit, pull, and push to repositories. SSH keys provide an easy way to authenticate to github. Together with ssh-agent and ssh-add it allows you to do multiple commtits without having to retype the password.
Contents
Keywords: ssh
Documentation for Linux and macOS
Please follow the Windows documentation, but instaed of using gitbash, pleas use the regular terminal. on macOS, make sure you have xcode installed.
Uploading the SSH key
Please ensure that you have Git (Git Bash) and a repository on GitHub. This tutorial assumes you already have a GitHub repository as well as a GitHub account.
-
Open Git Bash by pressing the Windows key, typing
git bash, and pressing Enter. -
Then, go on GitHub, click on your profile icon in the top right, click
Settings, and clickSSH and GPG keyson the left hand side. Confirm that there are no SSH keys associated with your account. If there are keys, then perhaps you have made some already. This tutorial focuses on creating a new one. -
Go back to Git Bash and type
ssh-keygen. PressEnter. PressEnteragain when it asks you the file in which to save the key (it should sayEnter file in which to save the key (/c/Users/USERNAME/.ssh/id_rsa):.- If you have already created a key here, it will ask you if you would like to overwrite the file. Type
yand pressEnter.
- If you have already created a key here, it will ask you if you would like to overwrite the file. Type
-
Enter a password that you will remember for your SSH key. It will not appear as you type it, so make sure you get it right the first time. Press
Enterafter typing the password that you come up with. -
After seeing the randomart image associated with your SSH, you should be able to type a new command. Type
cat ~/.ssh/id_rsa.puband pressEnter. Your key will appear— remember that this should not be shared with others. The key begins withssh-rsaand it may end with your username. Copy this entire key by clicking and dragging over it, right-clicking, and clickingCopy. -
Return to your web browser which is on the GitHub SSH key settings page. Click the green button that reads
New SSH Keyand type a Title for this key. You should name it something memorable and distinct; for example, if you just generated the key on your desktop computer, a suitable name isDesktop. If generated on your laptop, name itLaptop, or if you have numerous laptops, differentiate them with distinct names, and so on.- If you only have one computer and you have preexisting keys on this page, maybe some which you do not remember the password to or have fallen out of use, consider deleting them (as long as you are sure this will not break anything).
-
Paste the key into the key box. You should have copied it from Git Bash in Step #5. Then, click the green button that reads
Add SSH key. Congratulations— you have successfully configured your SSH key.
Using the ssh key
Now we will try cloning a repository. We use as an example a repository that we created for a student from a REU. Your example may be different. please adjust the repository name. Your repository will have a format of xxxx-reu-xxx
-
Navigate to your repository and
cdinto it. (In case of the REU we recommend to place it into a directory calledcybertraining-dsc.$ mkdir ~/Descktop/cybertraining-dsc $ cd cybertraining-dsc $ git clone git@github.com:cybertraining-dsc/YOURREPONAME.gitand replace YOURREPONAME with the name of your repository
-
Alternatively you can download it via the GitHub Web GUI. Once you are on your repository page, click the green button that reads
Codewith a download symbol. Click theSSHoption and click on the clipboard next to the link so that you copy it. It should sayCopied!after you click on it. -
Decide where you want your repository folder to be stored. This tutorial will clone the repo into the Documents folder. Go back to Git Bash and type
cd ~/Desktop/cybertraining-dscand pressEnter. It is a good idea to create a folder titledreufor organization. Typemkdir reuand pressEnter. Typecd reuand pressEnter. Finally, typegit clone, and after you put a space after clone, paste the copied link from GitHub. For example, your command should look similar to this:git clone git@github.com:cybertraining-dsc/su21-reu-361.gitThen, pressEnter.- The shortcut
Ctrl + Vdoes not work in Git Bash for pasting. Instead, you can pressShift + Insertto paste.
- The shortcut
-
Type in your password for your SSH key and press
Enter. The repo should clone with no issue. You can now typecode .and pressEnterto open VSCode in this directory. ClickYes, I trust the authorsif prompted in VSCode. If you use PyCharm instead of VSCode, you can open it from Windows search; inside of PyCharm, clickFile,Open...and then navigate toC:,Users, your username,Documents, and then click onreuso it is highlighted in blue and then clickOK. If PyCharm asks, you can choose to open it inThis Windowor aNew Window.
Using ssh-agent and ssh-add
If you do not want to always type in your password you can prior to the first commit in the termnal in which you issue the commits say
$ eval `ssh-agent`
$ ssh-add
3 - GitHub gh Command Line Interface
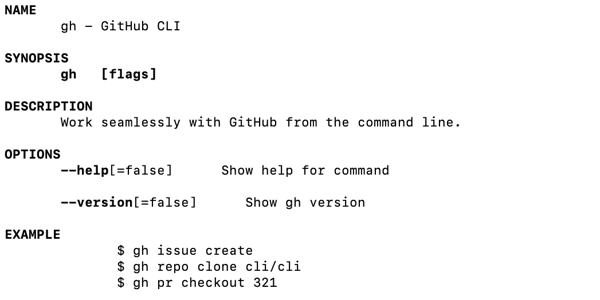
Figure 1: GitHub Command gh.
GitHub provides an extended gh commandline tool that allow easy interaction of forking repositories directly from github. IT also provides additional fimctionality to interact with other advanced features that are typically not provided in the git command tool.
Learning Objectives
- Learn how to install the gh command
- Learn how to use the gh command
Topics covered
1. Introduction
The new GitHub gh command allows GitHub users to work from the terminal of
their machine without having to visit the web browser GUI to manage things like
issues, PRs, and forking. We will show you what features it provides and how to
use it. The gh command provides useful features that is not provided by the `git
commandline tool.
2. Installing GitHub gh command
Visit the GitHub CLI homepage at https://cli.github.com/ for installation instructions. We recommend that you check out the source distribution because We found that whne we did this tutorial not all features were included in the brew instalation. We assume ths will cahnge over time and you may soon be able to just use the bre install on LInux and MacOs.
On mac, you can use the following command with Brew:
brew install gh
For Windows useser, please follow the install instructions fro Winodws.
3. Logging in with GitHub gh Command
It is best practice to be using SSH-keys with GitHub. Create one if you have not already with the following command:
ssh-keygen
We recommend t use the the default location.
To authenticate with the GitHub gh comamand, run the following command. We have included
the answers to the interactive prompts used for this guide.
gh auth login

What account do you want to log into? GitHub.com
? What account do you want to log into? GitHub.com
? What is your preferred protocol for Git operations? SSH
? Upload your SSH public key to your GitHub account? ~/.ssh/id_rsa.pub
? How would you like to authenticate GitHub CLI? Login with a web browser

! First copy your one-time code: 1234-1A11
- Press Enter to open github.com in your browser...
3.1 Adding Additional Keys
IN acse you work with multiple computers it is advisable to add your keys from these machines also. We demonstarte the interaction to upload the key from a new machine.
newmachine$ gh ssh-key add ~/.ssh/id_rsa.pub
Error: insufficient OAuth scopes to list SSH keys
Run the following to grant scopes: gh auth refresh -s write:public_key
newmachine$ gh auth refresh -s write:public_key

! First copy your one-time code: 4C2D-E896
- Press Enter to open github.com in your browser...
✓ Authentication complete. Press Enter to continue...

newmachine$ gh ssh-key add ~/.ssh/id_rsa.pub
✓ Public key added to your account
4. Forking
We can easily create a fork of a repo with the following:
gh repo fork
This is useful for when you do not have write access to the original repository.
5. Pull Requests
We can create a pull request easily as follows from a git repo:
gh pr create
The command above will ask the user where to push the branch (if it does not already exist on the remote). It will also offer the option to fork the initial repository. You will want to do this if you do not have write access to the original repo.
Once created, you may view the status of the PR with the following:
gh pr status
Reviewers can checkout your pull request to verify changes as follows:
gh pr checkout {PR NUMBER}
The reviewer can then approve the PR as follows:
gh pr review --approve
Subsequently, the PR can be merged as follows:
gh pr merge {PR NUMBER}
You may also list all pull requests with the following:
gh pr list
Finally, PRs can be closed with
gh pr close {PR NUMBER}
6. Managing Issues with GitHub gh Command
To create an issue, call the following:
gh issue create --title="Bug 1" --body="description"
We can also check the status of issues relevant to use with:
gh issue status
Alternatively, we may list all open issues.
gh issue list
Finally, we may close issues with:
gh issue close {ISSUE NUMBER}
7. Manual Pages
7.1 gh
gh(1)                                                                    gh(1)

NAME
       gh - GitHub CLI

SYNOPSIS
       gh   [flags]

DESCRIPTION
       Work seamlessly with GitHub from the command line.

OPTIONS
       --help[=false]      Show help for command

       --version[=false]      Show gh version

EXAMPLE
              $ gh issue create
              $ gh repo clone cli/cli
              $ gh pr checkout 321

SEE ALSO
       gh-alias(1),  gh-api(1),  gh-auth(1),  gh-completion(1),  gh-config(1),
       gh-gist(1),   gh-issue(1),   gh-pr(1),    gh-release(1),    gh-repo(1),
       gh-secret(1), gh-ssh-key(1)
7.2 List of Man Pages
Tha manual pages are published at the gh manual. For mor information you can also use the man command. A full list of manual pages includes:
- gh
- gh-alias-delete
- gh-alias-list
- gh-alias-set
- gh-alias
- gh-api
- gh-auth-login
- gh-auth-logout
- gh-auth-refresh
- gh-auth-status
- gh-auth
- gh-completion
- gh-config-get
- gh-config-set
- gh-config
- gh-gist-clone
- gh-gist-create
- gh-gist-delete
- gh-gist-edit
- gh-gist-list
- gh-gist-view
- gh-gist
- gh-issue-close
- gh-issue-comment
- gh-issue-create
- gh-issue-delete
- gh-issue-edit
- gh-issue-list
- gh-issue-reopen
- gh-issue-status
- gh-issue-view
- gh-issue
- gh-pr-checkout
- gh-pr-checks
- gh-pr-close
- gh-pr-comment
- gh-pr-create
- gh-pr-diff
- gh-pr-edit
- gh-pr-list
- gh-pr-merge
- gh-pr-ready
- gh-pr-reopen
- gh-pr-review
- gh-pr-status
- gh-pr-view
- gh-pr
- gh-release-create
- gh-release-delete
- gh-release-download
- gh-release-list
- gh-release-upload
- gh-release-view
- gh-release
- gh-repo-clone
- gh-repo-create
- gh-repo-fork
- gh-repo-view
- gh-repo
- gh-secret-list
- gh-secret-remove
- gh-secret-set
- gh-secret
- gh-ssh-key-add
- gh-ssh-key-list
- gh-ssh-key
7. Conclusion
There are many other commands for the GitHub CLI that can be found in the gh manual, however we only include a select number of relevant commands for this guide. The commands mentioned above serve to familiarize the user with the GitHub CLI while also providing practical usage.
4 - GitHub hid Repository
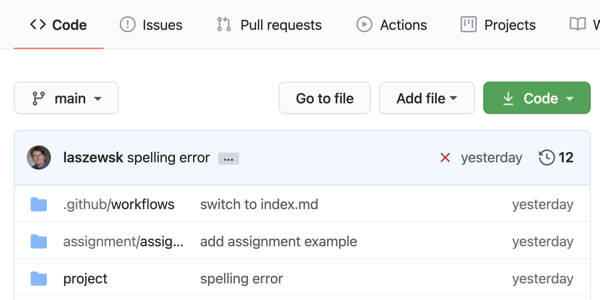
Figure 1: GitHub hid directory.
To contribute to our open source projects we provide you with a Git repository in which you conduct your activities.
Learning Objectives
- Learn how to cone the repo
- Learn how to use the rego
- Learn how to commit and push changes to GitHub
Topics covered
1. Introduction
As part of our open source activities, you will be given a GitHub repository. To contribute to our open source projects we provide you with a Git repository in which you conduct your activities.
We will explain how you use them from the command line.
2. Prerequisites
- On macOS we assume you have x-code installed which comes with the git command
- line tools On Windows we assume you have gitbash installed and use git
- through gitbash. Alternatively, you can use multipass, or WSL2 On Linux, make
- sure you have the git command line tools installed.
3. Setting up the ssh-key
In case you have not yet set up an ssh key, you can do this with the command.
$ ssh-keygen
YOu will be asked for the default location, accept it. After that, you will be asked for a passphrase. Please choose one and make sure you do not make it empty. Often you find wrong tutorials or guidance by others that say you can leave it empty. DO NOT FOLLOW THEIR WRONG ADVICE.
Upload the content of the file
$ cat ~/.ssh/id_rsa.pub
Into the GitHub portal at https://github.com/settings/keys.
You will then use the SSH key to authenticate to GitHub.
To not always have to type in the password you can use ssh-keychain.
On Mac OS you can simply use the command
$ ssh-add
and enter your password
4. Simplify the Tutorial while using Shell Variables
To simplify the tutorial we use from here on two shell variables. The first is
HID which specifies the name of your GitHub repository as found in
In our case, we use hid-example. The second variable is the name/path of the
editor in which we edit commit messages for git.
$ export HID=hid-example
$ export EDITOR=emacs
5. Cloning the Repository
Let us now clone the repository, change int the checked out repository and edit the project file.
$ git clone git@github.com:cybertraining-dsc/$HID.git
$ cd $HID/project
$ $EDITOR index.md
Now let us make a modification and save the file locally.
6. Commit Changes Locally
To commit the changes locally, you use the following command. Make sure to put a commit message and specify the filename.
$ git commit -m "Improved document with this and that" index.md
7. Adding Files
To add new files you can simply use the add command and use the commit command after it.
$ git add image/newimage.png
$ git commit -m "Improved document with this and that" image/newimage.png
8. Push the commits to GitHub
GitHub as you know is a service that stores your files once you push them from your local commits to GitHub. To push the commits use the command
$ git push
8. Pulling Changes
GitHub shines when you work with multiple people together on your projects. This may be project partners or feedbacks that are placed in your documents by us. Thus, it is important that you state in synchronization with the files in GitHub. Do this use the command
$ git pull
in any directory of the repository that you have checked out. It will update any file that has changed. In case of a conflict, your file will include a text such as
<<<<<<< HEAD
This is the new text from you
=======
This is the text in the repo
>>>>>>>
You will have to remove the text between the «< and »> and replace it with the text that is correct. In the simplest case, one of the choices will be correct. However, you may have in some cases to merge the two versions.
It is important to pull frequently. It is also important to not just paste and copy the entire file, but use the command line tools and editor to conduct the change as not to overwrite other changes.
7. Conclusion
The use of git from the command line is straightforward for existing
repositories. It is easy to do. Make sure to create an ssh-key and start in
synchronization with frequent pulls.